
Figure:The main window on start-up
When BurrTools is started for the very first time the GUI will look like Figure MainWindowStart which shows the main window. Although some small variations may occur depending on your operating system, screen resolution, and display preferences settings. The GUI has four major parts. On top there is a menu bar that allows handling of files and offers extra functionality as well as some preferences settings for the program. At the bottom there is a traditional status bar presenting relevant information about the task at hand. In between there is a tools section on the left and a 3-D viewport on the right.
Below is a brief overview of the main menu entries with references to the places in the text where a more detailed explanation is provided.
The File menu has all the traditional entries for handling files. Many of these are well known from other software and don't need much explanation. Some of the items also have keyboard shortcuts as indicated in the menus. Prior to executing most of these commands a warning (and option to cancel) is given whenever changes to the current design haven't been saved yet.
Since all imported shapes consist only of fixed voxels, the result shape may need some editing (puzzles that have internal holes or pieces not filling the outskirts of the result shape) to make the solver run. Also, duplicated pieces should preferably be deleted from the Shapes list (→ Creating Shapes) but certainly from the Piece Assignment list (→ Piece assignment), otherwise BURRTOOLS will find way too many solutions (as it will distinguish all permutations of these identical pieces).
Except when the solver is actually running, saving your work is always possible. This means that after stopping (pausing) the solver it is possible to save the results found thus far. Later on these partially solved puzzles can be loaded again and the solving process may be resumed. This allows you to subject 'huge' problems (e.g. 25 Y-pentominoes in a 5x5x5 cube assembly) to BURRTOOLS and have them solved in several sessions overnight or whenever you don't need your computer for other tasks.
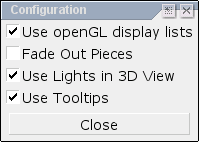
The Config item on the menu bar opens a new window (Figure Config) to set some options for the GUI. These settings will be stored in a file that is either in your home directory (UNIX) or in your profile (WINDOWS). The program will use these settings each time it is started.
The status bar has two parts. On the left is given information about the task at hand, and on the right are some tools to alter the 3-D view. Currently you can select there how the 3-D view shows the shapes. You have the choice between the normal view where each piece is drawn with its default colour, or a view where each piece is drawn with its colour constraint colour (if it has one assigned → Adding Colour). The third option is an anaglyph called mode (see figure Window Anaglyph). In this mode the pieces are drawn using the red-cyan method to display real 3-D. You can view these with a red-green, red-blue, or red-cyan glasses. The red glass must be in front of your right eye.

In between the menu bar and the status line is the most important part of BURRTOOLS: The section that allows you to submit existing puzzles to the solver, but more even important lets you create and test your own designs.
The tools section has three major tabs that might can be thought of by analogy with real people in the world of mechanical puzzles. First there is the Entities tab, which can be seen as the craftsman who creates different shapes but is not concerned with their purpose of these (→ Chapter Shapes). As long as his saw blade is sharp he's the happiest man in the whole wide world. Next, we have the Puzzle tab. This is the weirdo who thinks it's fun to come up with completely insane problems to be solved with the otherwise very innocent objects produced by our craftsman (→ Chapter Puzzles). However, his contribution to the preservation of our planet is considerable... by saving a lot of wood scraps from the incinerator. And last we have the Solver, the poor guy who spends not only a great deal of his money on these finely crafted puzzles but almost all of his leisure time on solving them (→ Chapter Solver), only to feel very euphoric when he finally succeeds. But scientists are still breaking their heads over the question whether this is caused by the sweet smell of success, or is merely due to severe sleep deprivation.
Although the layout of the GUI is designed to suit the needs of most users, it sometimes may be useful to resize some elements for convenience in using BURRTOOLS. Besides the traditional resizing of the main window, BURRTOOLS has a couple of features to alter the relative importance of its controls.
First, the tools tabs can be made wider or narrower (thus making the 3-D viewport more or less important) by dragging the right edge of the tools section. Hovering your mouse pointer over that edge will make it change into a left-right arrow, indicating that you can start dragging it.
Second, within each of the three main tabs some sections (panels) can be resized as well. For example, if you have a design with many different shapes but no colour constraints at all, reducing the size of all colour related controls and maximising those concerning shapes could be very advantageous. The panels on the tool tabs are separated by so called resize handles (Figure Resize). The separators that allow resizing are easily recognised by a little beveled square on their right end. Hover your mouse pointer over the lines until it changes into an up-down arrow, indicating that you can drag the separator up or down to resize the panel.

Note that each section has a minimum size. It is not possible to make it smaller than that minimum size.
Normally the biggest part of the GUI is reserved for the 3-D viewport. In fact this 3-D viewer is threefold and has different properties for each of the tabs of the tools section. For the Entities tab the 3-D viewport shows the currently selected shape and reflects all editing operations performed on that shape. Also the x-, y- and z-axes are shown to assist navigating in space. With the Puzzle tab activated an overview of the current problem is presented: the result shape (double sized) on top and a single instance of each shape used as pieces below it. Finally, for the Solver tab, the 3-D viewer can be used to browse all assemblies found and/or show an animation of the moves involved in the disassembly of the puzzle.
Any object in the 3-D view can be rotated by simply dragging it, and the scrollbar on the right allows zooming in or out on that object by respectively moving the slider down or up. Note that the zoom settings are independent for each of the three tools tabs.
Extra options for the 3-D viewer are available in the Config menu (→ Config Menu).