Figure:Solving puzzles
Solving puzzles is what BURRTOOLS is really about. Without its solving engine the program would be nothing more than a simple tool for drawing a very specific kind of 3-D objects... a task a lot of other software is no doubt even better suited for.
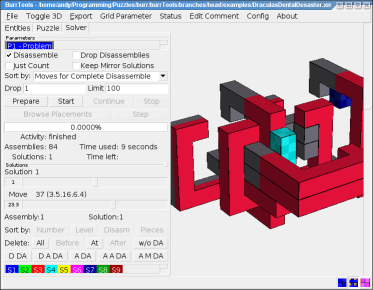
Solving puzzles is very straightforward with BurrTools even if the Solver tab (Figure Solver) has quite a few controls. On top there is the Parameters panel that contains a list allowing you to select a specific problem to be solved, provides option settings for the solver, and has a series of buttons to direct the solving process. Finally, some information on the ongoing solving process is presented.
A second panel (Solutions) has the tools to browse the different solutions found, animate the moves to disassemble the puzzle to inspect the solutions in detail, and to organize the solutions that have been found.
In order to make the solver run, a problem must be selected first. A list of all previously defined problems is available right below the Parameters caption. Selecting problems to be solved is similar to selecting shapes, colours, or problems on the other tabs. Note that only the selected problem will be solved, and that solving one problem will preserve the results of any already solved or partially solved problem. Currently there are the following options for the solver. All deal with the kind of information the solver will report.
Next to the solver options are some buttons to direct the solving process. Problems can be solved either in an automatic way or (manually) step-by-step.
An automatic search will proceed until all solutions, i.e. assemblies and disassemblies (when requested), are found. To begin an automated search, click the Start button. Typically the solving process consists of a preparation phase followed by several cycles of assembling and disassembling. The latter is of course omitted when the Solve Disassembly option is left unchecked.
The automatic solving process can be interrupted by clicking Stop, but often the solver needs to finish some tasks first before it can actually halt (→ Solver Information). Any interrupted solving process can be saved to the puzzle file and be resumed in another session with BURRTOOLS. In fact, on loading such a partially solved puzzle BURRTOOLS will inform you about the possibility to continue with the search for solutions.
When the solver is interrupted, the shapes (→ Chapter Shapes) and/or the problems (→ Chapter Puzzles) can be edited. If no editing whatsoever of these has been done, the solving process can be simply resumed (Continue), otherwise you need to start all over again. But keep in mind that the saving of the internal state of the solver is very version dependent. So it is likely that a new version of BURRTOOLS cannot resume solving a puzzle saved with an older version. So it is good practice to finish solving jobs with one version of BURRTOOLS before updating to the next.
When the solver is running it provides a lot of information about what it is doing and an estimate of the time it will need to finish the search. All this information is presented on six lines immediately below the solver control buttons (Figure Solver Information). Keep in mind that the estimated time to finish can be off by a very big amount. It happens often that the figure starts with ages and millennia and then the solving is finished within a few seconds, so be careful not to give up too soon.
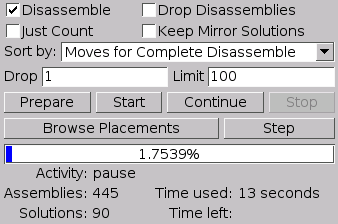
The first line of the solver information is a progress bar indicating the percentage of work it has done. The fifth (Time Used) and the sixth (Time Left) line respectively show the time already spent on the search and an estimate of the time still needed to finish the solving process. Note that these are very rough estimates since these are based on the possible placements of the pieces already tested and still to test. However, the possible placements to be tested are constantly fluctuating as they are determined by the positions of previously placed pieces (→ Browsing Placements).
Probably most important is the Activity and result information provided by the solver. The Activity line tells you not only what the solver is currently doing, but also whether the solver can be interrupted or not. The following is an overview of the activities of the solver:
Finally, the solver gives information about the Assemblies found thus far (i.e. assemblies for which the pieces do not overlap in 3-D space) and Solutions or disassemblies (i.e. assemblies that also can be constructed in real life using the particular pieces of the puzzle). Note that the Solutions are reported (and in fact tested) only if the Solve Disassembly option is enabled.
Besides the automated search, BurrTools allows you to run the solver step-by-step. Note that this feature is still under construction and that it has a lot of shortcomings. For instance, it won't add the solutions it finds to the list or update the solver information. So it certainly needs a lot of improvements in a future release of the program. For the time being it is useful only to check the assembly process when something went wrong with the automated search.
A manual search needs the initial preparation phase as well as an automatic search. This can be accomplished by clicking Prepare. The solver will halt after this initial phase and the subsequent steps of the assembler can be seen in the 3-D viewer by clicking the Step button.
The Browse Placements button opens a window (Figure Placement Browser) that lets you examine the positions for each piece that will by tried by the assembler. The placements displayed in this window are the possible positions left in the current state of the assembler. So if the assembler has placed a piece Sa and this prevents placing another piece Sb at some positions, those positions of piece Sb will not be visible in the list. If you want to see every placement tried, you have to either initialise a manual search (click the Prepare button), stop the assembler before is starts to do anything (click Stop while in preparation or optimisation stage), or wait until the assembler has finished its work.

The Placement Browser window (Figure Placement Browser) has a very simple layout and consist mainly of a 3-D viewer and some additional scrollbars. This 3-D viewport, which shows the outline of the result shape and therein the shape for which the possible positions are to be analysed, behaves similar to the viewport in the main window. Drag the piece to rotate it in space and use the scrollbar on the right to zoom in or out.
Each piece in the problem (including each instance of a multipiece) can be selected with the scrollbar on top of the window. The left scrollbar allows browsing all the different placements for the selected piece. Both these scrollbars can also be controlled with the cursor keys on the keyboard: [Up] and [Down] for the left scrollbar and [Left] and [Right] to select the piece. Be careful though, the first stroke on the keyboard that doesn't fit the current scrollbar will just select the other one and the following keystroke will start to move the slider.
As soon as any result is found, the solutions list becomes available on the Solutions panel and the 3-D viewer shows the first solution in the list. Note that subsequent solutions are simply added to that list, and that they can get sorted by the total number of moves (in case disassembly was requested) after the search is completed. All solutions that have been found can be inspected at any time, this does not interfere with the ongoing solving process. But completing the search and resetting the scrollbar for browsing the solutions may be needed to show the solutions properly ordered.
This panel has four components:
By moving the slider of the top scrollbar (Solution), any solution from the list can be selected as is indicated by its number in the text box left of the it. Above the scrollbar there is an indication of the total number of solutions in the list. When the scrollbar is active it can also be controlled by the [Left] and [Right] cursor keys. Keep in mind that the number of solutions in the list may be different from the real number of solutions. The correct number of solutions for the problem is shown in the solver progress section.
The second scrollbar (Move) also has a text box on the left, this time reflecting the stage of disassembly (i.e. the number of moves executed in the disassembling process) of the currently selected solution. Moving the slider to the right will animate the disassembly, moving it to the left will reassemble the pieces in the 3-D viewer. Again, when activated the scrollbar can be controlled by the [Left] and [Right] cursor keys. Above this scrollbar is shown the total number of moves required for the disassembly, followed by the level(s) of the selected solution. Note that this scrollbar is visible only for solutions that have disassembly instructions available.
The position of the Move scrollbar isn't affected by selecting any other solution, and thus allows easily comparing the different solutions at a particular stage in the disassembly process.
Below the Move scrollbar are 2 fields that show you 2 numbers associated with the currently selected solution. The first is the assembly number and the second is the solution number. Both numbers define when a solution was found. The first assembly found gets assembly number one. But for example that one might not be disassembable so it gets thrown away. The second assembly found gets assembly number two, and if it is also disassembable it gets solution number 1. So you will see assembly 2 and solution 1 in these 2 fields for the given example.
The big button group below the Solution selector and animator lets you modify the solutions. They are activated only when no solver is running.
With the buttons in the first row you can re-sort the solutions by the same criteria as you can select for the solver. You can sort them in the order they were found (unsorted) or by level or by sum of moves to completely disassemble and additionally be the pieces that are used in the solution.
The second row of buttons allows the deletion of certain solutions from the list.
The last row of buttons allow the addition or removal of disassemblies to the list of puzzles.
In the list at the bottom of the Solutions panel, all pieces used in the problem are represented by their identifier. Instances of multipieces have a counter added to their prefix which now takes the form 'Sx.n' and their default colour may be slightly modified to tell them apart.
By clicking an identifier, the visibility state of that particular piece is altered in the 3-D viewer. Each piece can have three states: visible, outlined, or invisible. Clicking an identifier repeatedly just cycles through these states and also alters the way the identifiers are depicted in the list. These features are very useful in designs for which the pieces are packed in a box, since the box would hide most of the action that is going on inside (e.g. AL PACKINO, → Appendix Examples). Also they are very useful for inspecting the interaction of a few pieces and allow comparison between different solutions, as the visibility states remain invariant in selecting solutions.
Additionally it is possible to set the visibility state of a piece to invisible by pressing [Shift] and then clicking onto the piece in the 3-D viewer. This is handy when using custom colours and the default colour is not visible or when there are many pieces and the distinction by colour becomes hard.
By default the pieces that become separated from the rest gradually fade out during the final move. Sometimes this is unwanted as it may hinder a clear view on what's going on. This can be avoided by unchecking Fade Out Pieces on the options window (activated through Config on the menu bar).
As not all pieces are used in all solutions, the list of pieces shows only the names of those pieces that are really used in the currently selected assembly. All other boxes become very small and contain no name. This should help to quickly find out which pieces are used and which piece on screen corresponds to what item in the piece visibility selector.