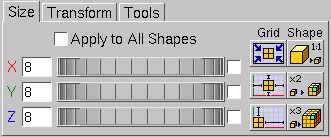
Figure: Grid and scaling functions
Since shapes are defined as objects in 3-D space, and theoretically 3-D space is unlimited in size, it's convenient somehow to be able to define a more feasible subspace to work with. This, and some more advanced scalings of the shapes, can be accomplished with the functions on the Size subtab (Figure SizeSubtab) of the Edit panel.

Note that the tab might look slightly different for different gridtypes. For example the sphere grid doesn't have the shape buttons as those are useless with that grid.
When the very first shape is initialised it has a default grid size. This default size is different for each grid. For example it is 6x6x6 for cubes. But if there is already a shape all other new shapes will inherit the grid size of the currently selected shape. This feature can be very useful in creating a series of shapes that are restricted with respect to certain dimensions (e.g. all pentacubes that fit in a 3x3x3 grid). Selecting the proper shape before creating a new one often can save a considerable amount of time by avoiding grid adjustments.
Adjusting the grid size to your needs can be done either by entering
values in the input boxes next to the axis labels, or by dragging the
spin wheels. When you enter values, the grid will be updated as soon as
you select one of the other input boxes (either by a mouse click or by
the [Tab] key), or when you press the [Return]
key. Note that the grid is also updated by simply clicking in or next
to the 2-D grid. To avoid unexpected results it's recommended always to
confirm the entered values with the [Return] key.
Increasing any grid dimension is completely harmless, but decreasing
them needs some caution since it can destroy parts of the shape.
The checkboxes for linking adjustments — to the right of the spin wheels — allow you to adjust two or all dimensions simultaneously. All linked dimensions will increase or decrease by the same absolute amount. However, none of the dimensions can be made smaller than 1 unit. Linked dimensioning is very useful in creating bigger and complex shapes such as the result shape of NO NUKES! (Ronald Kint-Bruynseels), which is easily done by first creating the central burr in a 6x6x6 grid and adding the extensions after resizing the grid to 14x14x14 and centring the 'core' in that enlarged grid.
BURRTOOLS has some powerful time-saving functions to manipulate the position of the shape in its grid or to rescale a shape together with the grid. These features are grouped below the captions Grid and Shape on the right side of the Size subtab. The first set of three will affect only the grid and/or the position of the shape in the grid, the other procedures however will have an impact on the shape itself by scaling it up or down.
Below is an overview of these functions, explaining precisely what they do and with an indication of the reason they were introduced into BURRTOOLS. No doubt you'll soon find other situations in which these tools can prove to be valuable.
Grid tools. Most of these tools are somewhat extended versions of the more general transformation tools (→ TransformationTool) and have the advantage that they can act on all shapes at once (→AdjustAllShapes).
Shape tools. Use the following functions wisely because unnecessary and extreme scaling up of the shapes will put a heavy load on your system resources and can increase solving time dramatically. Also, trying to undo such 'ridiculous' upscalings with the 1:1 tool can take a long time. So, think twice, click once...
These tools make sense only for spacegrids where a group of voxels can be grouped to make an upscaled shape that looks like a voxel of the grid, e.g. a group of 2x2x2 cubes looks like a bigger cube. As this doesn't work with spheres, these tools are not available there.
A last, but certainly not least, item to mention is the Apply to All Shapes checkbox. When checked, all shapes — whether they are selected or not — will be affected by the settings and procedures on the Size subtab. This is very useful and time saving when a certain adaptation needs to be done to all the shapes, e.g. transforming a six-piece burr with length 6 into one with length 8.
However, some precautions are built in to prevent accidental destruction of shapes. Manually reducing any grid dimension will still be performed only on the currently selected shape, whereas increasing (which is completely harmless to the shapes) will affect all grids. On the other hand, minimising the grids will be applied to all shapes since it is content related. The 1:1 tool won't affect any shape unless all shapes can be scaled down by the same factor. This prevents ending up with an unintended mixture of differently scaled shapes.