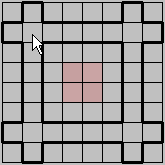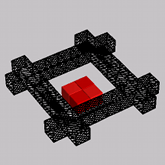
Figure: Toolbar and 2-D grid für cube space-grid
Once a shape has been initialised, the 2-D grid in which it can be built becomes accessible on the Edit panel. Basically one needs only three tools to create any shape, but some more features are added to make life easy. All these are on the toolbar right above the 2-D grid (Figure FigureToolbarGrid). The first four buttons are the basic drawing tools and colouring tool. These are all toggle buttons, meaning that enabling one will disable the others. They affect the presence and/or the state and colour of the voxels drawn by clicking in or dragging over the cells in the 2-D grid.

Next come two toggle buttons that allow you to select the drawing style. This is the way the basic drawing tools will respond to dragging the mouse over the grid cells. Finally, a series of compound drawing tools follows. These extend the range of the basic drawing tools and can all be cumulatively added to them.
Keep in mind that the grid looks differently for each space-grid. And for some spacegrids this 2-D grid is meant mainly for information as editing sphere shapes with the 2-D grid can be troublesome and with the rhombic grid is close impossible to properly edit a shape with the 2-D grid. That is why all shapes can be directly edited within the 3-D viewer. But nevertheless, the 2-D grid has its merits.
Building and editing can take place exclusively in the 2-D grid, and
then the 3-D viewport acts only as a visual aid. Both have their
corresponding axes in the same colour: red for the x-axis,
green for the y-axis and blue for the z-axis. For the 2-D
grid, which actually can show only a single layer at a time, the z-axis
is represented with a scrollbar (Figure
FigureToolbarGrid). By default every new shape starts on the bottom
layer and the scrollbar allows you to move up and down through the
different layers along the z-axis (the number of z-layers is always
indicated with the proper number of ticks along the scrollbar). Another
way to navigate these z-layers is by pressing [+] (moves
up one layer) or [-] (moves down one layer) on the
keyboard.


Moving the mouse cursor over the 2-D grid gives an indication of the cell(s) — depending on the state of the compound drawing tools — that will be affected by clicking. These indications are also reflected in the 3-D viewer. Furthermore, to facilitate positioning on different layers every non-empty voxel on the 2-D layer just below the current one 'shines through' in a very light shade of the default colour associated with that shape (Figure FigureNavigation). This makes building shapes from bottom to top very easy.
With larger grid sizes the cells of the 2-D grid can become very
small, even when the available area for the grid on the Entities
tab is maximised. To overcome this inconvenience the 2-D grid and the
3-D viewport can be exchanged. To do so, click the Toggle 3D
item on the menu bar or press [F4]. Note that this affects
only the position of the 3-D viewport for the Entities tab.
The basic drawing tools affect the presence and/or the state of a particular voxel in the shape. In fact, together with the brush tool (→Brush Tool) they are all that's needed to create any shape in BURRTOOLS. The following is a description of these tools. Note that each is also accessible through a keyboard short cut.
[F5].
[F6].
[F7].BURRTOOLS has two different drawing styles. These styles affect the way voxels are drawn/erased or colours are added by dragging with the mouse. In drawing shapes by simply clicking 'cell-by-cell' both are equivalent.
The status of these drawing styles is remembered by BURRTOOLS so that it always defaults to the drawing style that was active on the last shut down of the program.
Although the basic drawing tools are all that is needed for creating shapes, some compound drawing tools are added to speed up the process. The compound drawing tools can be added cumulatively to the basic drawing tools and only extend the range of action for the latter ones.
Note that these tools always function along the 3 orthogonal axes, so they are very useful for cubes but might need a bit of getting used to for the other spaces as they might behave differently along the 3 axes. The triangular prisms for example are stacked along the z-axis, side by side along the x-axis and tip by tip along the y-axis.
As editing non rectangular shape with the 2-D grid is cumbersome, it is also possible to do some editing using the 3-D view directly by simply clicking onto faces to add the corresponding neighbour voxel. This will always only add or remove single voxels and will not honor the compound drawing settings. The following actions are possible:
[Shift] and clicking
onto a face. The neighbour is added.[Alt] and clicking
onto a face. Again the neighbour is added.[Ctrl] and clicking onto a
voxel. This removes the voxel.As spheres do not really have touching faces the 3-D view of them does contain circles with a slightly different colour around the places where the spheres would tough. Clicking on those circles on the sphere adds the corresponding neighbour sphere.
To avoid having to click all that often you can wiggle the mouse around to get a repeated action. So if you want to "drill" a hole into a shape place your mouse there, click and drag over the hole and the voxels will be gone much faster than with repeated clicking.