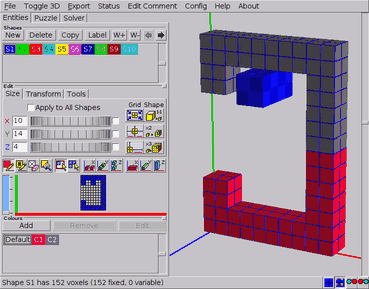
Figure: A shape with custom colours
There are basically two reasons for using colours in your puzzle designs. The first is merely aesthetic: colours are used only to explore the looks of the puzzle. This can help you selecting the proper species of woods or stains before taking your design to the workshop. The second however is far more important, as it uses colours to force or prevent certain positions of particular pieces in the assembly. These constraining techniques can be very useful to pursue a unique solution for a puzzle design. Of course one can try to achieve both the aesthetic and constraining goals at the same time. Figure FigureCustomColours shows an example of DRACULA'S DENTAL DISASTER (Ronald Kint-Bruynseels) in which colours serve both. The red and black voxels are meant to impose constraints on the placements of the pieces, whereas the white colour of the parts on the inside of the pieces is used only to make them look nice.

Even when no 'special' colours at all are used, the program assigns each shape its own different nominal colour. This is the so-called default colour and is there only to distinguish the shapes from one another. These default colours are standard for each newly created shape (the first one in the shapes list is always blue, the second one green, the third one red, etc...) and cannot be altered.
As far as the solver is concerned, the default colour doesn't even exist, as all appearances of it are fully interchangeable. So any voxel in the pieces that has only the default colour can go into any voxel of the result shape, and every voxel in the result that has no other colour than the default can accommodate any voxel of the pieces, independent of its colour.
Independent from their default colour, voxels can have customised colours as extra attributes. To avoid confusion, it's recommended to make these colours well distinguishable from the default colours in use, since a custom colour that is identical to one of the default colours will have a completely different effect on the way the solver behaves. Almost without exception custom colours need some constraint settings (→ ColourConstraints) to make the solver run.
The tools for creating and editing colours are located on the Colours panel of the Entities tab. This panel also has a list in which the colours can be selected to be used in the design or to be edited. The New button allows you to create a custom colour. A dialogue will pop up and present you the necessary tools to create the colour you need. Accordingly the Edit button allows you to transform an already existing colour using a similar dialogue. This dialogue also shows the currently selected colour for comparison (unless the default colour is selected, which makes the dialogue to show the default medium grey). Note that the default colour can be neither removed nor changed. It's important to realise that the BURRTOOLS engine discriminates custom colours only by number as indicated in their prefix 'Cx' and not by the actual colours themselves. Hence it is possible to create identical colours that nevertheless will be treated as different. So, it's strongly advised to introduce only colours whose difference can easily be discerned. Otherwise, finding out why a puzzle has no solutions can be very hard. The Remove button will not only discard the colour from the list, but will also remove it from any voxel that has it as an attribute by replacing it with the default colour.
When you add a colour, BURRTOOLS automatically adds a constraint rule that pieces of this colour can be placed into result voxels of this colour. This is done by default because it is the way colours are most often used. If you don't want this constraint you have to explicitly remove the rules (→ ColourConstraints). Also, when a new problem is created BURRTOOLS automatically adds one such rule for each existing colour.
Colours can be applied while drawing the shape. Just select a colour and it will become an extra attribute of the fixed pen or the variable pen. Additional colouring can be done by using the Brush tool.
[F8]
on the keyboard.The behaviour of this brush tool is similar to that of the drawing pens. So it obeys the drag styles and can be extended with the compound drawing tools. Note that the right mouse button will still completely erase the voxel.