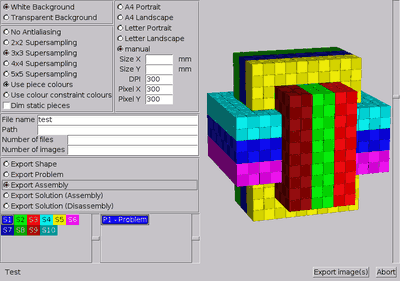
Figure: The image export window
The Export - Images entry on the menu opens a window that allows you to export a portion of the current puzzle to (a list of) images (see Figure ImageExport). On the right the window has a 3D view, and on the left it has input elements that control what is being created. On the very bottom of these controls you can select what you want to create images of. Depending on what is present in the puzzle, the following things can be exported:

What to export is the first thing that you have to select. Naturally only the choices are available for which the puzzle has data. So if you have not run the solver on the current puzzle, it is impossible to export solutions or assemblies.
Above these selectors you find the file output parameters. First the name and the path to where the images are supposed to be created. If you give no path, the images are put into the working directory of the program. The file name is just a prefix, so if you keep 'test' as file name you get files of the form 'test000.png', 'test001.png', ... . (BURRTOOLS creates only PNG image files)
Finally, you can say how many images you intend to create. BURRTOOLS will try to do so, but might use less. If you only have one assembly to export, only one page can be created. The Number of images entry is ignored by the software for the time being, it will be used later on.
Above these input elements you find the last section that defines your output. Here you can define the quality and some additional parameters that influence how the images look, but not what is to be seen.
In the top left corner you find the definition of the background of the image. You can choose between transparent or white. Transparent is useful if you want to have a background with patterns or want to further edit the images.
Below you find the settings for the oversampling factor. The higher that is, the smoother the images will look, but the more memory and calculation time is required.
Below you can choose whether you want to use the constraint colours for the output or rather the default colour of the shapes.
The checkbox Dim static pieces makes BURRTOOLS draw pieces that are not involved in the current move in a lighter colour, so that the pieces actually moving are easier to spot. This, of course, only works when exporting solutions.
Finally there are the parameters for the image size that the program creates. There are 2 choices: either define the pixel size directly, or define the size of the image in millimetres and the DPI printer resolution. If you want to create A4 or letter sized images for printing, you can use the predefined sizes.
To position the shapes in the output images, you can use the 3D view at the right of the export window. All images exported will use the same settings for angle and zoom as in that 3D view. If the shapes reach above or below the 3D view they will be trimmed. Left and right is different. The width of the images to generate is not fixed. So the program will make them quite a bit wider to accommodate the horizontal spread of the pieces.
When you have finished with all settings, press Export Image(s). You will see a flurry of images in the 3-D view. The program draws the shapes there and grabs the content from the display. This may take a while. First the size of the images is determined, then the images are drawn in the required high resolution for the output. The progress can be seen on the left beside the 2 buttons. You will see how many images are finished and how many there are overall.
Hint: If you get unexpected results and broken images, try to do nothing while the images are exported. On Linux it is forbidden to change the virtual desktop because then nothing is drawn.
The export facilities are far from what we want them to be, many important features are missing, so you can expect some progress in later versions of BURRTOOLS.